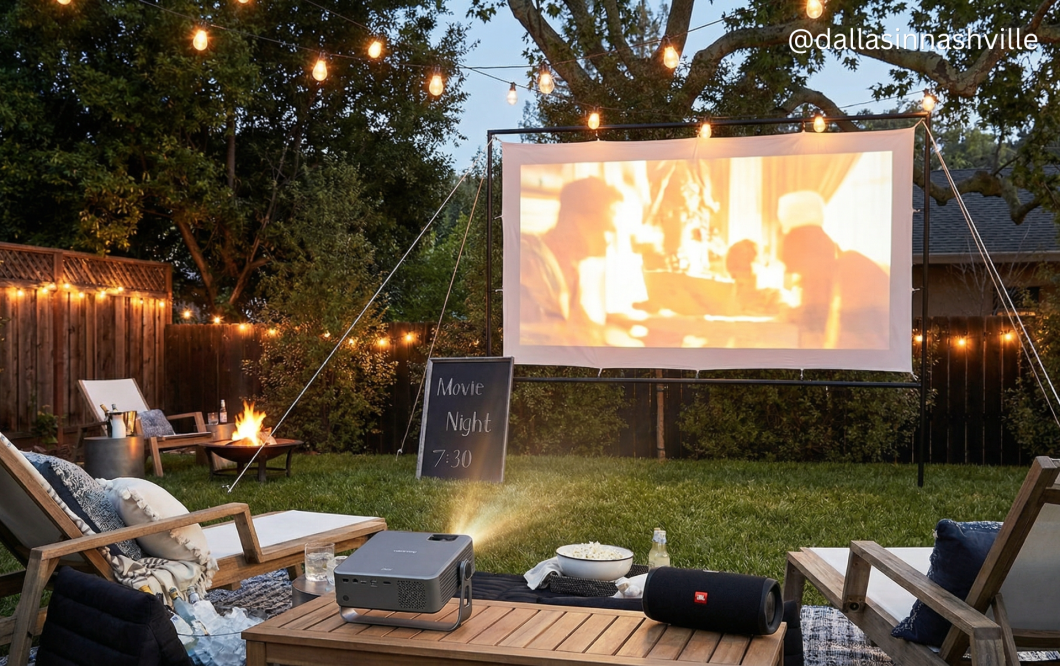
A backyard movie night is one of those things that sounds complicated and expensive until you actually look into it — and then you realize you can pull off a genuinely great outdoor movie experience for well under $200 if you shop smart. We have been doing this for a couple of summers now and it has become one of my favorite things to host. The setup is easier than you’d expect, and the payoff — watching a movie under the open sky with good people and great snacks — is really hard to beat.
Here is everything you need to know to set it up, keep costs down, and make it an evening people actually remember.
This post contains affiliate links. If you purchase through my links, I earn a small commission at no extra cost to you.
What You Need (The Shopping List)
- Budget projector — around $60–$80 with coupon on Amazon
- Outdoor projector screen with stand — around $100 for a 120-inch screen
- Streaming device — Fire TV Stick ($30–$50) or Roku Stick
- Outdoor extension cord — at least 50 feet, with multiple outlets
- Bluetooth speaker (optional but recommended) — JBL Flip or similar
- Adjustable tripod or stand for the projector (optional — a table or stool works too)
That’s the whole list. You do not need anything fancy or expensive to make this work. Let me break each piece down.
The Projector

A good budget projector from Amazon — look for one with 5G Wi-Fi, Bluetooth, and at least 9,000 lumens — runs around $60 to $80 when you click the coupon on the product page
. That lumen count is important because it determines how well the picture shows up in less-than-fully-dark conditions. The higher the lumens, the better the image in ambient light.
Look for a projector that supports 4K input, has iOS and Android pairing, and comes with Dolby sound built in. At this price point, the options have genuinely gotten very good in the last couple of years. Read the reviews and sort by most recent — projectors are one of those categories where the Amazon deals get better all the time.
The projector does need to be plugged in — I will cover the power situation below.
The Screen

You can have short product description here. It can be added as and enable/disable toggle option from which user can have control on it.
A 120-inch outdoor projector screen with a stand runs around $100 and gives you a much better picture than any DIY alternative — the surface is designed for wide-angle viewing and produces richer, clearer colors. If you are doing this regularly, the screen is worth the investment.
The Cheap DIY Alternative
If you want to spend almost nothing on a screen, a white shower curtain liner stretched between two poles or hung from a fence works surprisingly well. Bungee cord it tight so there are no wrinkles, and you have a functional screen for around $20. It is not as crisp as a proper screen but it absolutely works and the kids will not care at all.
How to Stream Movies
The easiest way to stream movies onto a projector is with an Amazon Fire TV Stick or a Roku Stick. Plug it into the HDMI port on the back of the projector, follow the setup instructions to connect to your Wi-Fi, sign into your streaming services — Netflix, Disney+, Hulu, Prime Video, Apple TV+, whatever you use — and you are ready to go.
The Fire TV Stick 4K runs about $50 and gives you the best picture quality. The basic Fire TV Stick Lite is around $30 and works completely fine if you are not concerned about 4K resolution. For a backyard setup on a 120-inch screen at a distance, honestly the Lite version is more than adequate for most people.
No streaming subscription? Download a free movie beforehand through your library’s Kanopy or Hoopla app, or check what is available for free on Tubi, Pluto TV, or Peacock’s free tier.
Powering the Projector
The projector needs an outlet, which means you need a long outdoor extension cord. Get one that is at least 50 feet with multiple outlets so you can plug in both the projector and the streaming stick. Run it from your nearest outdoor outlet — a back porch outlet, a garage outlet, or a side-of-house outlet all work. Tuck it along the fence or edge of the yard and make sure it is not crossing anywhere people will walk in the dark. This is the one safety thing worth being thoughtful about.
Positioning the Projector
An adjustable laptop tripod stand for around $30 to $40 makes it easy to raise, lower, and angle the projector to fit the screen perfectly. If you do not want to spend anything extra, a sturdy table, a stool, or even a cooler you already own works just fine. The projector just needs to be centered and level with the screen at roughly the right height.
Sound

A JBL Flip or any similar mid-size portable Bluetooth speaker does the job well. For larger groups, a bigger speaker like a JBL Charge or Boombox bumps the volume significantly.
Most budget projectors have a built-in speaker that works well enough for smaller gatherings. If you want better sound or more volume — especially for a bigger group spread out in the yard — pair the projector via Bluetooth to a portable speaker and place it in the middle of the seating area.
If you already own a portable speaker of any kind, start with what you have. You can always upgrade later.
Seating
Pull out every lawn chair, camp chair, and patio chair you own and arrange them in a loose arc facing the screen. For a more laid-back setup, spread blankets and throw pillows on the grass. A mix of both — chairs in the back, blankets on the ground up front — gives people options and tends to look really inviting.
Have a stack of extra blankets nearby for when the night cools down. Even in summer, Nashville evenings can get comfortable once the sun goes down, and nothing ends a backyard movie night faster than people getting cold. For a really fun kids’ setup, let them bring sleeping bags and make it a mini campout vibe.
Lighting
You want the movie area to be dark, but you still need enough ambient light so people can safely get up for snacks or a bathroom break without tripping. String lights hung along a fence or overhead in the yard away from the screen are perfect for this — they add atmosphere without washing out the picture. Solar walkway lights along a path to the back door are another easy option.
If there are kids in the crowd, hand out glow sticks. They keep little ones occupied during slow scenes, they cost almost nothing at the dollar store, and they make the whole setup feel a little more magical. Highly recommend.
Timing
Plan for guests to arrive about an hour before sunset so everyone has time to get settled, grab snacks, and let the kids run around while there is still light. The picture looks best starting a few minutes after the sun fully sets — check the day’s weather forecast for the exact sunset time and plan your invite window accordingly. For Nashville summers, that puts your movie start somewhere around 8:30 to 9 PM depending on the time of year.
Snacks
The snacks are half the event. Keep it simple and self-serve so you are not running back and forth to the kitchen all night.
Popcorn
Popcorn is non-negotiable. A Whirley Pop stovetop popcorn maker makes theater-quality popcorn in about three minutes and is one of the best cheap kitchen investments you can make. Make a big batch before guests arrive, set out paper bags or buckets for serving, and put out a few flavored salts or seasonings so people can customize. If you want to go all out, a small tabletop popcorn machine is a really fun touch and not as expensive as you would think.
Movie Theater Candy
The dollar store or Target dollar section usually has movie theater-style candy — M&Ms, Skittles, Whoppers, Twizzlers, Gummy Bears, Junior Mints, Milk Duds. Set them out in a basket or a wooden crate and let people grab what they want. It costs almost nothing and feels instantly festive.
Drinks
A cooler stocked with bottled water, sodas, and a few canned drinks covers most guests. For the adults, a big batch of sangria or lemonade in a drink dispenser is an easy self-serve option that looks great and requires zero effort during the movie. If the night is cool, a slow cooker of hot apple cider or cocoa on a nearby table is a really cozy touch.
S’mores
If you have a fire pit — or even a tabletop fire bowl — set out a s’mores station with graham crackers, chocolate bars, marshmallows, and roasting sticks. It gives people something to do during the pre-movie hang and the kids will be occupied for a solid twenty minutes. This is especially great for cooler nights when a small fire adds warmth and ambiance at the same time.
Other Easy Snack Ideas
- Chips and salsa or guacamole
- Chex mix or trail mix in a big bowl
- Nachos (easy to set up as a topping bar)
- Pizza slices (order ahead and keep warm in a covered dish)
- Candied pecans — very Nashville, very easy
What to Watch
For a mixed crowd of adults and kids, crowd-pleaser picks that work for almost any age are your best bet — think The Parent Trap, Jumanji, Matilda, The Princess Bride, Hocus Pocus in October, or a classic Disney film. For an adults-only crowd, summer is a great time for something nostalgic — a John Hughes movie, a rom-com from the early 2000s, or whatever was the favorite movie of the decade everyone grew up in. The nostalgia factor adds something to the whole experience.
The whole setup can be done for well under $200 if you already own lawn chairs and a speaker, and under $250 if you need everything from scratch. Either way, it is one of the best ways to spend a summer evening — and once you have done it once, you will find yourself looking for excuses to do it again all season.